3bolt79
Moderator
- Joined
- Jun 28, 2024
- Messages
- 652
- Reaction score
- 1,260
Now that you are familiar with the tools you will need, let’s get started.
First thing, let’s remove the strings and remove the back cover plate.


With the Strings off, check that the neck is striaght by laying the ruler across the frets and checking for any gaps where the frets aren’t touching the straight edge.

If there is a gap, you will need to tighten the truss rod. Looking from the headstock down at the guitar, Turn it to the right with the appropriate size Allen Wrench.
As this is a Made in Mexico Player Plus Top Strat, it will take SAE size wrenches for the Truss Rod and the Saddles.
This guitar will need a 3/16 Allen Wrench for the Truss Rod

Once the neck is straight, check to be sure that all the frets are seated properly by using the Fret Rocker or Credit Card that you cut to check for in even frets.
Start by laying the Rocker over the first 3 frets and check to see if it wiggles, or rocks, when you press it down onto the frets. If it does, that means that the 2nd fret is high.
Tap the fret down with the rubber hammer and check again with the Rocker. If it doesn’t rock or wiggle any more, move up to the second fret, lay it across the second, third and fourth frets, and repeat the procedure.
If there is no rocking, move up a fret and repeat, until you’ve checked all the frets going up the neck, towards the bridge. Check the fret at the Low E and High E sides of the neck as well as the middle of the frets as well.
Once you are done with this procedure, it’s time to put the strings back on.

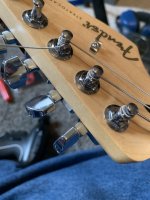
Start by putting the Low E String through the proper hole in the back of the Tremolo block and pull the string through the hole in the tuning peg and grab the string half way between the A and D string tuners.
Pull the string back out of the Low E String Tuner until you reach the point where your thumb marked the string.
Then wrap the string once over the top and wind the string under the tail of the string.

You will wind up with one wrap over and one wrap under the tail of the string. Then cut it flush.
Repeat with the A and D strings pulling the string back through the hole after marking the string with your thumb 2 tuning pegs away from the peg that you are winding the string on.
Wrap one loop over get top of the tail and wind the rest of the string under. You want 1 to 2 wraps underneath the tail. Cut flush and repeat on the G, B, and High E strings.
When doing the plain steel strings try to mark where 2 1/2 tuning pegs would occur. Slide it back through the hole to the point where you touch the tuning peg that you are working on. You want at least 3 turns under the tail and one over.

Cut the tail of the strings and tune up. Having one wrap over the top of the tail and the rest under will sandwich or pinch the string tightly once the strings is at full tension and this helps prevent slippage.
See Part III….
First thing, let’s remove the strings and remove the back cover plate.
With the Strings off, check that the neck is striaght by laying the ruler across the frets and checking for any gaps where the frets aren’t touching the straight edge.
If there is a gap, you will need to tighten the truss rod. Looking from the headstock down at the guitar, Turn it to the right with the appropriate size Allen Wrench.
As this is a Made in Mexico Player Plus Top Strat, it will take SAE size wrenches for the Truss Rod and the Saddles.
This guitar will need a 3/16 Allen Wrench for the Truss Rod
Once the neck is straight, check to be sure that all the frets are seated properly by using the Fret Rocker or Credit Card that you cut to check for in even frets.
Start by laying the Rocker over the first 3 frets and check to see if it wiggles, or rocks, when you press it down onto the frets. If it does, that means that the 2nd fret is high.
Tap the fret down with the rubber hammer and check again with the Rocker. If it doesn’t rock or wiggle any more, move up to the second fret, lay it across the second, third and fourth frets, and repeat the procedure.
If there is no rocking, move up a fret and repeat, until you’ve checked all the frets going up the neck, towards the bridge. Check the fret at the Low E and High E sides of the neck as well as the middle of the frets as well.
Once you are done with this procedure, it’s time to put the strings back on.
Start by putting the Low E String through the proper hole in the back of the Tremolo block and pull the string through the hole in the tuning peg and grab the string half way between the A and D string tuners.
Pull the string back out of the Low E String Tuner until you reach the point where your thumb marked the string.
Then wrap the string once over the top and wind the string under the tail of the string.
You will wind up with one wrap over and one wrap under the tail of the string. Then cut it flush.
Repeat with the A and D strings pulling the string back through the hole after marking the string with your thumb 2 tuning pegs away from the peg that you are winding the string on.
Wrap one loop over get top of the tail and wind the rest of the string under. You want 1 to 2 wraps underneath the tail. Cut flush and repeat on the G, B, and High E strings.
When doing the plain steel strings try to mark where 2 1/2 tuning pegs would occur. Slide it back through the hole to the point where you touch the tuning peg that you are working on. You want at least 3 turns under the tail and one over.
Cut the tail of the strings and tune up. Having one wrap over the top of the tail and the rest under will sandwich or pinch the string tightly once the strings is at full tension and this helps prevent slippage.
See Part III….
Attachments
Last edited: